Usage
After installing the plugin (please see Installation), a new Test protocol IO button will appear in each of the already configured Setups.
Warning
At the moment, it is required that a Bpod device is connected to the computer to run the module.
Note
The button will only be active when there is both a valid board and protocol selected in the Setup details.
When pressing the button, with a Bpod device connected, the window presented in the next figure will appear.
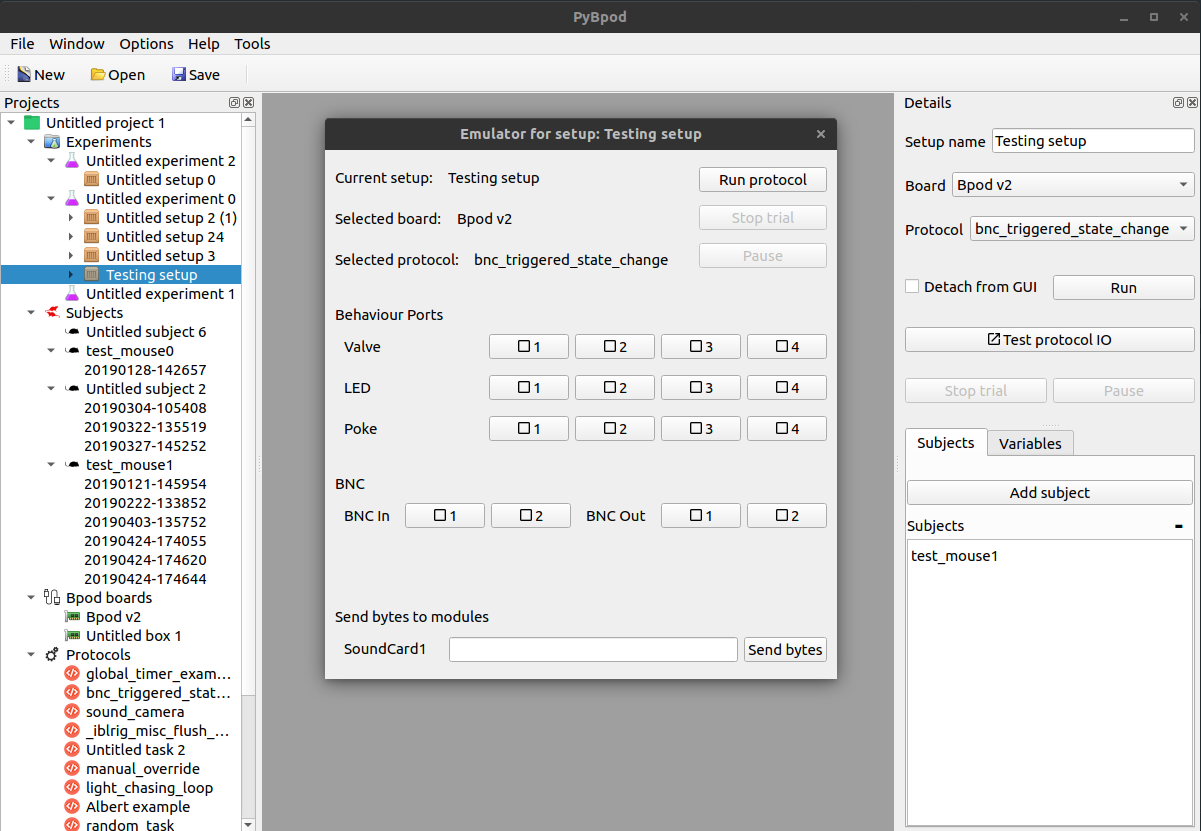
PyBpod’s Main window with the Emulator Window opened
At the top of the window it is possible to see the selected Setup, the selected Board and protocol. The buttons that are also available in the Setup details of PyBpod are also available in the Emulator window (i.e., Run, Stop trial and Pause).
Afterwards, a section with the Behaviour Ports is presented with three rows of buttons, each button for each available port. Each row represents the Valve, LED and the Poke.
Note
The Emulator window will adapt automatically depending on the Bpod device version connected. For example, when connecting a Bpod v0.7, each row for the Behaviour Ports will present 8 buttons, representing the 8 Behaviour Ports available in that model.
After the Behaviour Ports, a section with the BNC connections is displayed, with two buttons for the inputs and two for the outputs.
For Bpod v0.7 a new section with the Wire connections will appear after the BNC connections as it is possible to see in the next figure.

Emulator Window for Bpod v0.7
When modules are connected to Bpod, they will also show up at the bottom of the window so it will be possible to send serial messages to those modules using the Emulator.
Interaction
To use the Emulator it is required, at the moment, that a device is connected and that a protocol is running. As such, the first step is to run the protocol using the appropriate button.
While the protocol is running, when pressing the different buttons for different actions, different events will be triggered.
As an example, if the Poke button 1 is pressed once (active state), it will trigger the ‘Port1In’ event. If pressed again (disabled state), it will trigger the ‘Port1Out’ event. As such, when running the example protocol presented below, which changes state when the ‘Port1Out’ event occurs, the PWM1 output channel (LED) will be turned on during the 3 seconds duration of the state ‘Port3LightOn’. When pressing the Poke button 1 twice, both the ‘Port1In’ and ‘Port1Out’ events are triggered by Bpod as if there was a real interaction in the Poke of the Behaviour Port.
from pybpodapi.protocol import Bpod, StateMachine

my_bpod = Bpod()

sma = StateMachine(my_bpod)

sma.add_state(
    state_name='Port1LightOn',
    state_timer=1,
    state_change_conditions={Bpod.Events.Port1Out: 'Port3LightOn'},
    output_actions=[])

sma.add_state(
    state_name='Port3LightOn',
    state_timer=3,
    state_change_conditions={Bpod.Events.Tup: 'exit'},
    output_actions=[(Bpod.OutputChannels.PWM1, 255)])

my_bpod.send_state_machine(sma)

my_bpod.run_state_machine(sma)

print("Current trial info: {0}".format(my_bpod.session.current_trial))

my_bpod.close()
As it can be seen from this example, the protocol written can be used either with the plugin or directly, with no changes necessary to test the input and output ports and if the events are being triggered as expected.
The available input and output channel names, as well as the event names, for both the Bpod v0.7 and Bpod v2 are presented in the next sections.
Note
For either case of the Bpod’s hardware version, it is assumed that firmware version 22 is installed.
Input channel names
| Input channel | Bpod v0.7 | Bpod v2 |
|---|---|---|
| Serial1 | ✓ | ✓ |
| Serial2 | ✓ | ✓ |
| Serial3 | ✓ | ✓ |
| Serial4 | ✗ | ✓ |
| Serial5 | ✗ | ✓ |
| USB1 | ✓ | ✓ |
| BNC1 | ✓ | ✓ |
| BNC2 | ✓ | ✓ |
| Wire1 | ✓ | ✗ |
| Wire2 | ✓ | ✗ |
| Port1 | ✓ | ✓ |
| Port2 | ✓ | ✓ |
| Port3 | ✓ | ✓ |
| Port4 | ✓ | ✓ |
| Port5 | ✓ | ✗ |
| Port6 | ✓ | ✗ |
| Port7 | ✓ | ✗ |
| Port8 | ✓ | ✗ |
| GlobalTimer1 | ✓ | ✓ |
| GlobalTimer2 | ✓ | ✓ |
| GlobalTimer3 | ✓ | ✓ |
| GlobalTimer4 | ✓ | ✓ |
| GlobalTimer5 | ✓ | ✓ |
| GlobalTimer6 | ✗ | ✓ |
| GlobalTimer7 | ✗ | ✓ |
| GlobalTimer8 | ✗ | ✓ |
| GlobalTimer9 | ✗ | ✓ |
| GlobalTimer10 | ✗ | ✓ |
| GlobalTimer11 | ✗ | ✓ |
| GlobalTimer12 | ✗ | ✓ |
| GlobalTimer13 | ✗ | ✓ |
| GlobalTimer14 | ✗ | ✓ |
| GlobalTimer15 | ✗ | ✓ |
| GlobalTimer16 | ✗ | ✓ |
Output channel names
| Output channel | Bpod v0.7 | Bpod v2 |
|---|---|---|
| Serial1 | ✓ | ✓ |
| Serial2 | ✓ | ✓ |
| Serial3 | ✓ | ✓ |
| Serial4 | ✗ | ✓ |
| Serial5 | ✗ | ✓ |
| SoftCode | ✓ | ✓ |
| BNC1 | ✓ | ✓ |
| BNC2 | ✓ | ✓ |
| Wire1 | ✓ | ✗ |
| Wire2 | ✓ | ✗ |
| Wire3 | ✓ | ✗ |
| PWM1 | ✓ | ✓ |
| PWM2 | ✓ | ✓ |
| PWM3 | ✓ | ✓ |
| PWM4 | ✓ | ✓ |
| PWM5 | ✓ | ✗ |
| PWM6 | ✓ | ✗ |
| PWM7 | ✓ | ✗ |
| PWM8 | ✓ | ✗ |
| Valve1 | ✓ | ✓ |
| Valve2 | ✓ | ✓ |
| Valve3 | ✓ | ✓ |
| Valve4 | ✓ | ✓ |
| Valve5 | ✓ | ✗ |
| Valve6 | ✓ | ✗ |
| Valve7 | ✓ | ✗ |
| Valve8 | ✓ | ✗ |
| GlobalTimerTrig | ✓ | ✓ |
| GlobalTimerCancel | ✓ | ✓ |
| GlobalCounterReset | ✓ | ✓ |
Event names
Note
In the following table, to reduce the size of the table, a convention was defined to aggregate several names of the events. For example, where it can be read Serial1_[1-15], it means that we can have Serial1_1, Serial1_2, until Serial1_15.
| Event names | Bpod v0.7 | Bpod v2 |
|---|---|---|
| Serial1_[1-15] | ✓ | ✓ |
| Serial2_[1-15] | ✓ | ✓ |
| Serial3_[1-15] | ✓ | ✓ |
| Serial4_[1-15] | ✗ | ✓ |
| Serial5_[1-15] | ✗ | ✓ |
| SoftCode[1-15] | ✓ | ✓ |
| BNC1High | ✓ | ✓ |
| BNC1Low | ✓ | ✓ |
| BNC2High | ✓ | ✓ |
| BNC2Low | ✓ | ✓ |
| Port1In | ✓ | ✓ |
| Port1Out | ✓ | ✓ |
| Port2In | ✓ | ✓ |
| Port2Out | ✓ | ✓ |
| Port3In | ✓ | ✓ |
| Port3Out | ✓ | ✓ |
| Port4In | ✓ | ✓ |
| Port4Out | ✓ | ✓ |
| Port5In | ✓ | ✗ |
| Port5Out | ✓ | ✗ |
| Port6In | ✓ | ✗ |
| Port6Out | ✓ | ✗ |
| Port7In | ✓ | ✗ |
| Port7Out | ✓ | ✗ |
| Port8In | ✓ | ✗ |
| Port8Out | ✓ | ✗ |
| GlobalTimer1_Start | ✓ | ✓ |
| GlobalTimer2_Start | ✓ | ✓ |
| GlobalTimer3_Start | ✓ | ✓ |
| GlobalTimer4_Start | ✓ | ✓ |
| GlobalTimer5_Start | ✓ | ✓ |
| GlobalTimer6_Start | ✗ | ✓ |
| GlobalTimer7_Start | ✗ | ✓ |
| GlobalTimer8_Start | ✗ | ✓ |
| GlobalTimer9_Start | ✗ | ✓ |
| GlobalTimer10_Start | ✗ | ✓ |
| GlobalTimer11_Start | ✗ | ✓ |
| GlobalTimer12_Start | ✗ | ✓ |
| GlobalTimer13_Start | ✗ | ✓ |
| GlobalTimer14_Start | ✗ | ✓ |
| GlobalTimer15_Start | ✗ | ✓ |
| GlobalTimer16_Start | ✗ | ✓ |
| GlobalTimer1_End | ✓ | ✓ |
| GlobalTimer2_End | ✓ | ✓ |
| GlobalTimer3_End | ✓ | ✓ |
| GlobalTimer4_End | ✓ | ✓ |
| GlobalTimer5_End | ✓ | ✓ |
| GlobalTimer6_End | ✗ | ✓ |
| GlobalTimer7_End | ✗ | ✓ |
| GlobalTimer8_End | ✗ | ✓ |
| GlobalTimer9_End | ✗ | ✓ |
| GlobalTimer10_End | ✗ | ✓ |
| GlobalTimer11_End | ✗ | ✓ |
| GlobalTimer12_End | ✗ | ✓ |
| GlobalTimer13_End | ✗ | ✓ |
| GlobalTimer14_End | ✗ | ✓ |
| GlobalTimer15_End | ✗ | ✓ |
| GlobalTimer16_End | ✗ | ✓ |
| GlobalCounter1_End | ✓ | ✓ |
| GlobalCounter2_End | ✓ | ✓ |
| GlobalCounter3_End | ✓ | ✓ |
| GlobalCounter4_End | ✓ | ✓ |
| GlobalCounter5_End | ✓ | ✓ |
| GlobalCounter6_End | ✗ | ✓ |
| GlobalCounter7_End | ✗ | ✓ |
| GlobalCounter8_End | ✗ | ✓ |
| Condition1 | ✓ | ✓ |
| Condition2 | ✓ | ✓ |
| Condition3 | ✓ | ✓ |
| Condition4 | ✓ | ✓ |
| Condition5 | ✓ | ✓ |
| Condition6 | ✗ | ✓ |
| Condition7 | ✗ | ✓ |
| Condition8 | ✗ | ✓ |
| Condition9 | ✗ | ✓ |
| Condition10 | ✗ | ✓ |
| Condition11 | ✗ | ✓ |
| Condition12 | ✗ | ✓ |
| Condition13 | ✗ | ✓ |
| Condition14 | ✗ | ✓ |
| Condition15 | ✗ | ✓ |
| Condition16 | ✗ | ✓ |
| Tup | ✓ | ✓ |